

Integrate data lakes with Tiger Cloud
Unify the Tiger Cloud operational architecture with data lake architectures
Tiger Cloud Iceberg connector enables you to build real-time applications alongside efficient data pipeline management within a single system.
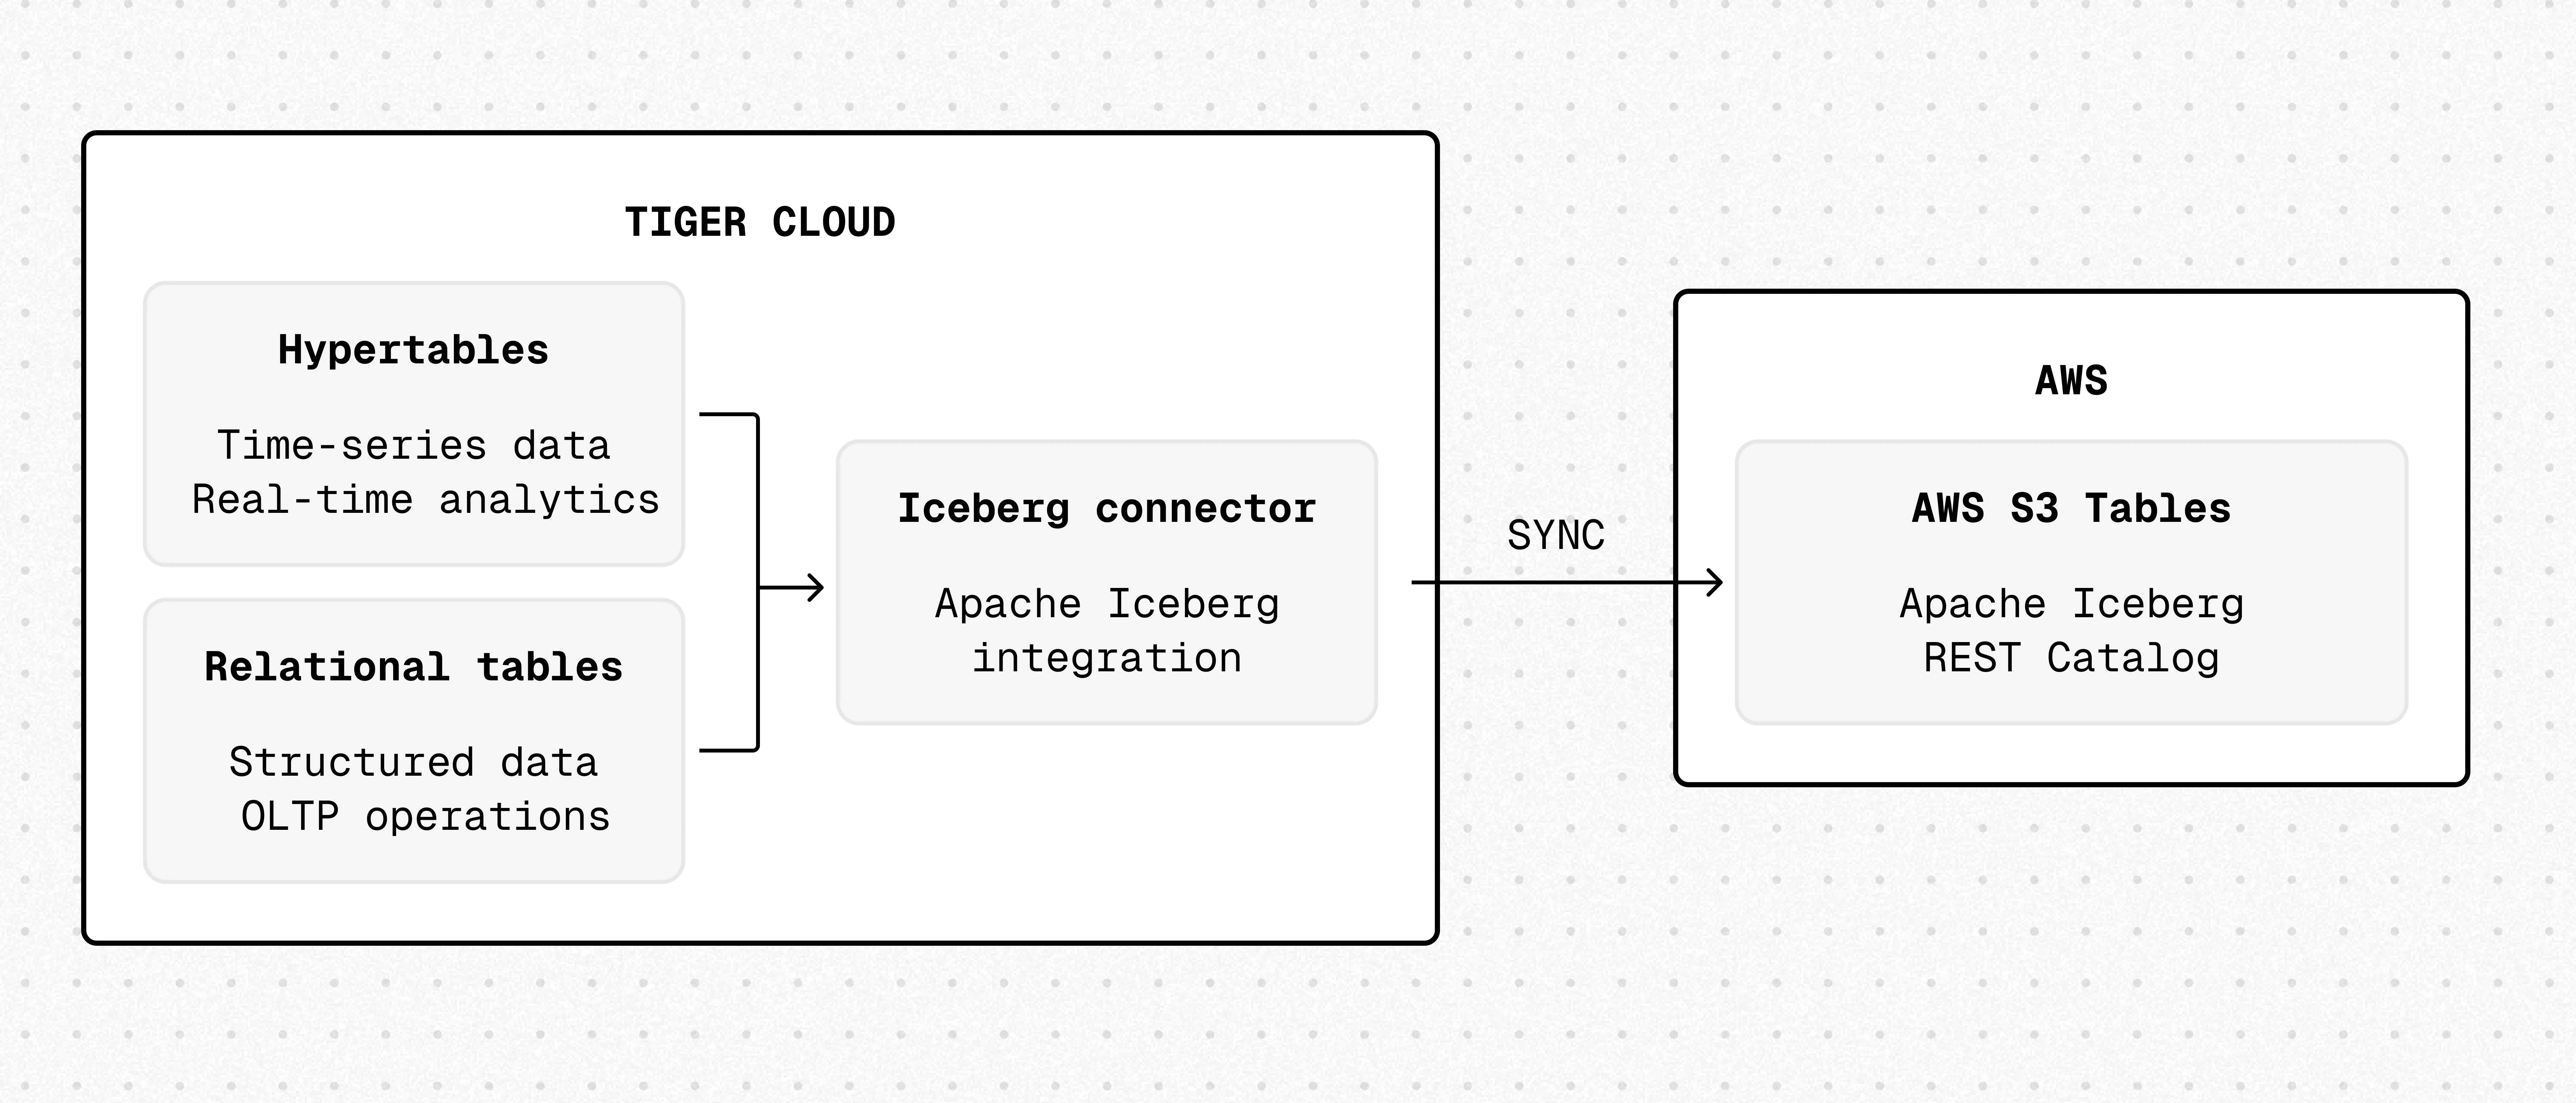
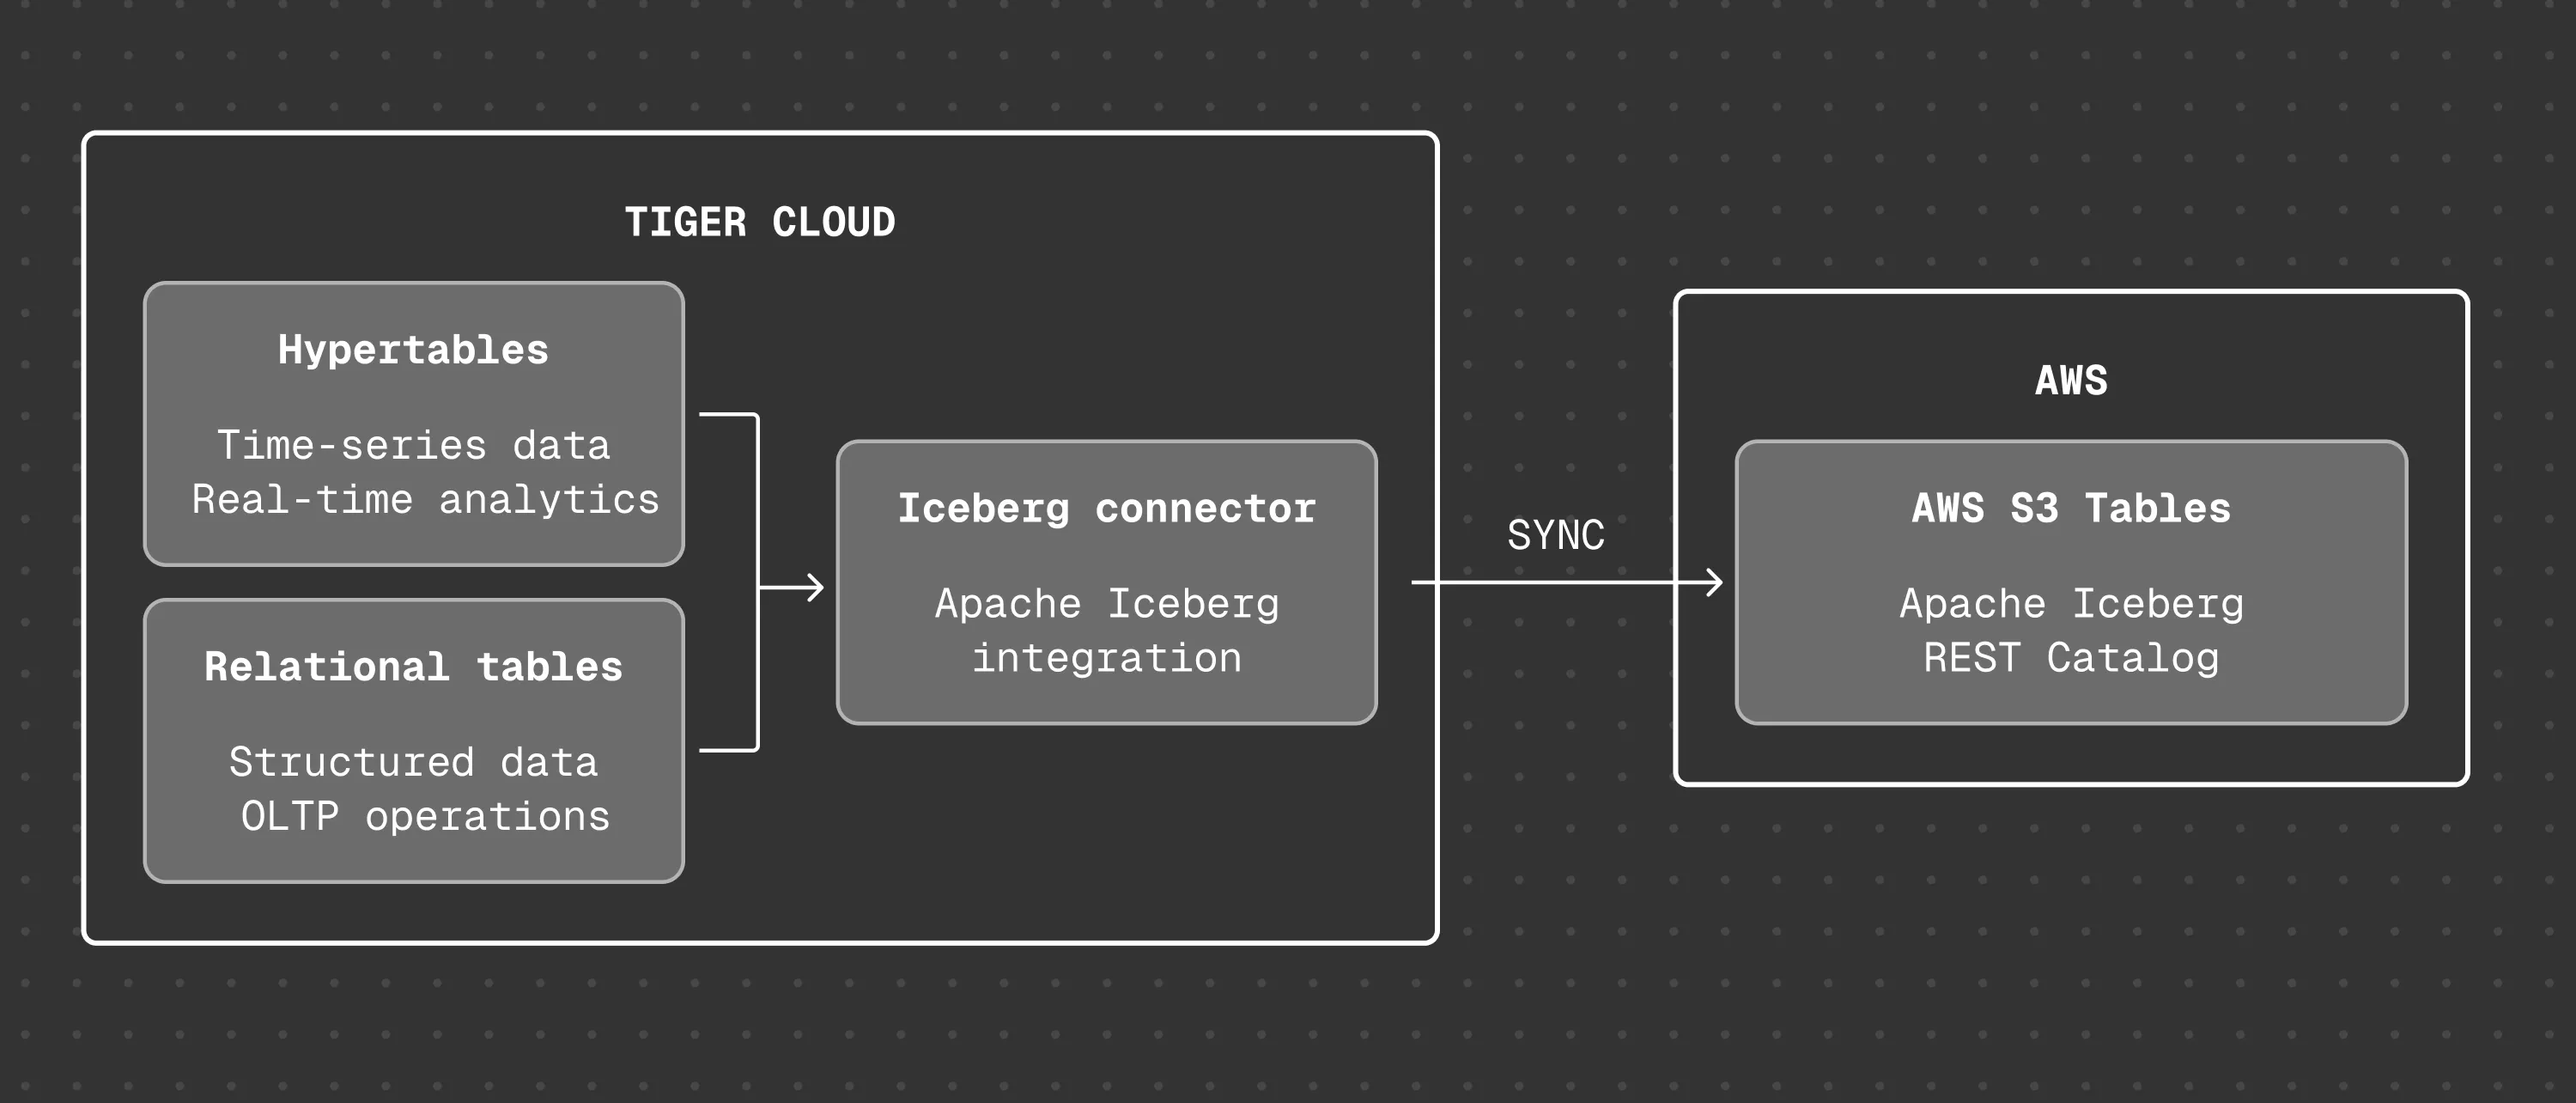
Tiger Cloud Iceberg connector synchronizes hypertables and relational tables running in Tiger Cloud services to Apache Iceberg tables. You can write to Amazon S3 Tables in your AWS account, or connect to a compatible Iceberg REST catalog.
Iceberg connector takes an initial snapshot of the source table, then continuously applies inserts, updates, and deletes using PostgreSQL logical replication. This makes operational data available in your data lake without building and operating a separate ETL pipeline.
Once set up, you can query that data directly. For example, see Query TigerLake S3 Tables with AWS Glue and Athena or Query TigerLake S3 Tables from Snowflake.
Prerequisites for this integration guide
To follow these steps, you'll need:
This feature is currently not supported for Tiger Cloud on Microsoft Azure.
Choose an Iceberg catalog
Section titled “Choose an Iceberg catalog”Tiger Cloud Iceberg connector supports the following catalog options:
| Catalog | Use when |
|---|---|
| Amazon S3 Tables | You want an AWS-managed Iceberg catalog and storage service. Iceberg connector connects using an IAM role. |
| Generic Iceberg REST catalog | You already use a compatible Iceberg REST catalog, such as Snowflake Open Catalog, Apache Polaris, or Snowflake Horizon Catalog. Iceberg connector connects using OAuth 2.0 client credentials or a personal access token. |
Amazon S3 Tables is configured separately because it uses AWS IAM and SigV4 authentication. Generic REST catalogs use the Iceberg REST Catalog API, and can provide access to the underlying object storage through vended credentials.
Connect using Amazon S3 Tables
Section titled “Connect using Amazon S3 Tables”To connect a Tiger Cloud service to Amazon S3 Tables:
- Set the AWS region to host your table bucket
- In AWS CloudFormation, select the current AWS region at the top-right of the page.
- Set it to the Region you want to create your table bucket in.
This must match the region your Tiger Cloud service is running in: if the regions do not match AWS charges you for cross-region data transfer.
- Create your CloudFormation stack
-
Click
Create stack, then selectWith new resources (standard). -
In
Amazon S3 URL, paste the following URL, then clickNext.https://tigerlake.s3.us-east-1.amazonaws.com/tigerlake-connect-cloudformation.yaml -
In
Specify stack details, enter the following details, then clickNext:Stack Name: a name for this CloudFormation stackBucketName: a name for this S3 table bucketProjectIDandServiceID: enter the connection details for your Tiger Cloud Iceberg connector service
-
In
Configure stack optionscheckI acknowledge that AWS CloudFormation might create IAM resources, then clickNext. -
In
Review and create, clickSubmit, then wait for the deployment to complete. AWS deploys your stack and creates the S3 table bucket and IAM role. -
Click
Outputs, then copy all four outputs.
-
- Connect your service to the data lake
- In Tiger Console, select the service you want to integrate with AWS S3 Tables, then click
Connectors. - Select the Apache Iceberg connector and supply the:
- ARN of the S3Table bucket
- ARN of a role with permissions to write to the table bucket
Provisioning takes a couple of minutes.
- In Tiger Console, select the service you want to integrate with AWS S3 Tables, then click
- Create your CloudFormation stack
Replace the following values in the command, then run it from the terminal:
Region: region of the S3 table bucketStackName: the name for this CloudFormation stackBucketName: the name of the S3 table bucket to createProjectID: enter your Tiger Cloud service connection detailsServiceID: enter your Tiger Cloud service connection details
Terminal window aws cloudformation create-stack \--capabilities CAPABILITY_IAM \--template-url https://tigerlake.s3.us-east-1.amazonaws.com/tigerlake-connect-cloudformation.yaml \--region <Region> \--stack-name <StackName> \--parameters \ParameterKey=BucketName,ParameterValue="<BucketName>" \ParameterKey=ProjectID,ParameterValue="<ProjectID>" \ParameterKey=ServiceID,ParameterValue="<ServiceID>"Setting up the integration through Tiger Console in Tiger Cloud, provides a convenient copy-paste option with the placeholders populated.
- Connect your service to the data lake
- In Tiger Console, select the service you want to integrate with AWS S3 Tables, then click
Connectors. - Select the Apache Iceberg connector and supply the:
- ARN of the S3Table bucket
- ARN of a role with permissions to write to the table bucket
Provisioning takes a couple of minutes.
- In Tiger Console, select the service you want to integrate with AWS S3 Tables, then click
- Create a S3 Bucket
-
Set the AWS region to host your table bucket:
- In Amazon S3 console, select the current AWS region at the top-right of the page.
- Set it to the Region your you want to create your table bucket in.
This must match the region your Tiger Cloud service is running in: if the regions do not match AWS charges you for cross-region data transfer.
-
In the left navigation pane, click
Table buckets, then clickCreate table bucket. -
Enter
Table bucket name, then clickCreate table bucket. -
Copy the
Amazon Resource Name (ARN)for your table bucket.
-
- Create an ARN role
-
In IAM Dashboard, click
Rolesthen clickCreate role. -
In
Select trusted entity, clickCustom trust policy, replace theCustom trust policycode block with the following:{"Version": "2012-10-17","Statement": [{"Effect": "Allow","Principal": {"AWS": "arn:aws:iam::142548018081:root"},"Action": "sts:AssumeRole","Condition": {"StringEquals": {"sts:ExternalId": "<ProjectID>/<ServiceID>"}}}]}"Principal": { "AWS": "arn:aws:iam::123456789012:root" }does not meanrootaccess. This delegates permissions to the entire AWS account, not just the root user. -
Replace
<ProjectID>and<ServiceID>with the connection details for your Tiger Cloud Iceberg connector service, then clickNext. -
In
Permissions policies, clickNext. -
In
Role details, enterRole name, then clickCreate role. -
In
Roles, select the role you just created, then clickAdd Permissions>Create inline policy. -
Select
JSONthen replace thePolicy editorcode block with the following:{"Version": "2012-10-17","Statement": [{"Sid": "BucketOps","Effect": "Allow","Action": ["s3tables:*"],"Resource": "<S3TABLE_BUCKET_ARN>"},{"Sid": "BucketTableOps","Effect": "Allow","Action": ["s3tables:*"],"Resource": "<S3TABLE_BUCKET_ARN>/table/*"}]} -
Replace
<S3TABLE_BUCKET_ARN>with theAmazon Resource Name (ARN)for the table bucket you just created. -
Click
Next, then give the inline policy a name and clickCreate policy.
-
- Connect your service to the data lake
- In Tiger Console, select the service you want to integrate with AWS S3 Tables, then click
Connectors. - Select the Apache Iceberg connector and supply the:
- ARN of the S3Table bucket
- ARN of a role with permissions to write to the table bucket
Provisioning takes a couple of minutes.
- In Tiger Console, select the service you want to integrate with AWS S3 Tables, then click
If your table bucket is encrypted with a customer managed AWS KMS key (SSE-KMS) instead of the default AWS managed encryption, the role you supply to Tiger Cloud Iceberg connector also needs kms:GenerateDataKey and kms:Decrypt permissions on that key. Without them, Iceberg connector cannot write to the bucket and syncs fail with a not authorized to perform: kms:GenerateDataKey error. Add the following statement to the role's inline policy, replacing <KMS_KEY_ARN> with the ARN of your KMS key:
{ "Sid": "KMSAccess", "Effect": "Allow", "Action": [ "kms:GenerateDataKey", "kms:Decrypt" ], "Resource": "<KMS_KEY_ARN>"}Connect using an Iceberg REST catalog
Section titled “Connect using an Iceberg REST catalog”Before creating the connector, configure a catalog principal with permission to:
- Access the target warehouse.
- List and create namespaces.
- Create and update Iceberg tables.
- Commit Iceberg table metadata.
- Access the underlying object storage, if the catalog vends storage credentials.
To connect your Tiger Cloud service to a generic Iceberg REST catalog:
- Select the catalog type
- In Tiger Console, select the service you want to integrate with your Iceberg catalog, then click
Connectors. - Select the Apache Iceberg destination connector, then select
Generic REST catalog. - Choose a preset for your catalog provider, or select
Generic RESTto configure the connection manually.
- In Tiger Console, select the service you want to integrate with your Iceberg catalog, then click
- Configure the catalog connection
Enter the catalog connection and authentication settings:
Setting Required Description Catalog URIYes HTTPS base URL of the Iceberg REST catalog. Don't include a namespace or table path. WarehouseYes Warehouse, catalog, or external volume identifier expected by the catalog. The exact value depends on the catalog provider. Client IDNo OAuth 2.0 client identifier. Leave empty when authenticating with a personal access token instead. Client secretYes OAuth 2.0 client secret, or personal access token. Tiger Cloud stores this value securely. ScopeNo OAuth 2.0 scope required by the catalog. Vended credentialsNo Requests temporary object storage credentials from the catalog. Turn this on if your catalog supports it. Additional headersNo Catalog-specific HTTP headers to include with REST requests. - Create the connector
Click
Set up connector. Tiger Cloud validates the catalog connection, credentials, and warehouse access before creating the connector.
The catalog URI must use HTTPS. The catalog principal must have permission to access the configured warehouse, and to create or update its Iceberg namespaces and tables.
Storage access for REST catalogs
Section titled “Storage access for REST catalogs”A REST catalog manages Iceberg metadata; the underlying table data is still stored in object storage. When you turn
on Vended credentials, Iceberg connector requests temporary storage credentials from the catalog and uses them to
write Iceberg data files. Otherwise, configure your catalog's own access controls to grant Iceberg connector the
storage access it needs directly.
Catalog-specific setup
Section titled “Catalog-specific setup”The endpoint, warehouse identifier, OAuth 2.0 scope, and access-control model differ between catalog providers. Create the required catalog principal and warehouse permissions in your catalog provider's own console before configuring the connector in Tiger Console.
Selecting a preset in Tiger Console fills in known defaults for that provider. It doesn't create the warehouse, catalog principal, or permissions on your behalf.
Stream data from your service to your data lake
Section titled “Stream data from your service to your data lake”Records are imported in time order, from oldest to newest. Your hypertable or relational table must have a primary key, or composite primary keys as a prerequisite to sync to Iceberg.
When you start syncing, all data in the table is streamed to Iceberg in the following processes:
- Table snapshot: stream data from a snapshot of the source table to the destination Iceberg table at approximately 300.000 records a second. For larger tables, import speeds are approximately 1 billion records or 100 GB of data an hour. However, these numbers vary on table width and the complexity of the schema.
- Table changes: stream changes made to the source table (CDC) after the snapshot is taken to a branch of the destination Iceberg table. This happens at approximately 30.000 events a second. Ingest bursts exceeding this can be handled for a certain amount of time and feathered out over time. This depends on duration of the ingestion burst, and the amount of extra events to be handled.
Once the snapshot is fully imported, the snapshot and CDC Iceberg table branches are merged. Merging takes from a couple of seconds, to ten minutes for larger tables of 5TB or more. During this time, new events are held on the WAL. Once the merge is completed, events in the WAL are CDC'd to Iceberg. This implies eventual consistency of the Iceberg table after you started the the sync.
To stream data from a PostgreSQL relational table, or a hypertable in your Tiger Cloud service to your data lake, run the following statement:
ALTER TABLE <table_name> SET ( tigerlake.iceberg_sync = true | false, tigerlake.iceberg_partitionby = '<partition_specification>', tigerlake.iceberg_namespace = '<namespace>', tigerlake.iceberg_table = '<table>')tigerlake.iceberg_sync:boolean, set totrueto start streaming, orfalseto stop the stream. A stream cannot resume after being stopped.tigerlake.iceberg_partitionby: optional property to define a partition specification in Iceberg. By default the Iceberg table is partitioned asday(<time-column of {HYPERTABLE}>). This default behavior is only applicable to hypertables. For more information, see partitioning.tigerlake.iceberg_namespace: optional property to set a namespace, the default istimescaledb.tigerlake.iceberg_table: optional property to specify a different table name. If no name is specified the PostgreSQL table name is used.
Partitioning intervals
Section titled “Partitioning intervals”By default, the partition interval for an Iceberg table is one day(time-column) for a Hypertable. PostgreSQL table sync does not enable any partitioning in Iceberg for non-hypertables. You can set it using tigerlake.iceberg_partitionby. The following partition intervals and specifications are supported:
| Interval | Description | Source types |
|---|---|---|
hour | Extract a date or timestamp day, as days from epoch. Epoch is 1970-01-01. | date, timestamp, timestamptz |
day | Extract a date or timestamp day, as days from epoch. | date, timestamp, timestamptz |
month | Extract a date or timestamp day, as days from epoch. | date, timestamp, timestamptz |
year | Extract a date or timestamp day, as days from epoch. | date, timestamp, timestamptz |
truncate[W] | Value truncated to width W, see options |
These partitions define the behavior using the Iceberg partition specification.
Sample code
Section titled “Sample code”The following samples show you how to tune data sync from a hypertable or a PostgreSQL relational table to your data lake:
-
Sync a hypertable with the default one-day partitioning interval on the
ts_columncolumnTo start syncing data from a hypertable to your data lake using the default one-day chunk interval as the partitioning scheme to the Iceberg table, run the following statement:
ALTER TABLE my_hypertable SET (tigerlake.iceberg_sync = true);This is equivalent to
day(ts_column). -
Specify a custom partitioning scheme for a hypertable
You use the
tigerlake.iceberg_partitionbyproperty to specify a different partitioning scheme for the Iceberg table at sync start. For example, to enforce an hourly partition scheme from the chunks onts_columnon a hypertable, run the following statement:ALTER TABLE my_hypertable SET (tigerlake.iceberg_sync = true,tigerlake.iceberg_partitionby = 'hour(ts_column)'); -
Set the partition to sync relational tables
PostgreSQL relational tables do not forward a partitioning scheme to Iceberg, you must specify the partitioning scheme using
tigerlake.iceberg_partitionbywhen you start the sync. For example, for a standard PostgreSQL table to sync to the Iceberg table with daily partitioning , run the following statement:ALTER TABLE my_postgres_table SET (tigerlake.iceberg_sync = true,tigerlake.iceberg_partitionby = 'day(timestamp_col)'); -
Stop sync to an Iceberg table for a hypertable or a PostgreSQL relational table
ALTER TABLE my_hypertable SET (tigerlake.iceberg_sync = false); -
Update or add the partitioning scheme of an Iceberg table
To change the partitioning scheme of an Iceberg table, you specify the desired partitioning scheme using the
tigerlake.iceberg_partitionbyproperty. For example. if thesamplestable has an hourly (hour(ts)) partition on thetstimestamp column, to change to daily partitioning, call the following statement:ALTER TABLE samples SET (tigerlake.iceberg_partitionby = 'day(ts)');This statement is also correct for Iceberg tables without a partitioning scheme. When you change the partition, you do not have to pause the sync to Iceberg. Apache Iceberg handles the partitioning operation in function of the internal implementation.
Specify a different namespace
By default, tables are created in the the timescaledb namespace. To specify a different namespace when you start the sync, use the tigerlake.iceberg_namespace property. For example:
ALTER TABLE my_hypertable SET ( tigerlake.iceberg_sync = true, tigerlake.iceberg_namespace = 'my_namespace');Specify a different Iceberg table name
The table name in Iceberg is the same as the source table in Tiger Cloud.
Some services do not allow mixed case, or have other constraints for table names.
To define a different table name for the Iceberg table at sync start, use the tigerlake.iceberg_table property. For example:
ALTER TABLE Mixed_CASE_TableNAME SET ( tigerlake.iceberg_sync = true, tigerlake.iceberg_table = 'my_table_name');Limitations
Section titled “Limitations”- Service requires PostgreSQL 17.6 and above is supported.
- Amazon S3 Tables and compatible generic Iceberg REST catalogs are supported. Catalog behavior, authentication requirements, and support for vended credentials vary by provider. Amazon S3 Tables is the most thoroughly tested catalog: confirm the support status of a specific REST catalog before using it for a production workload.
- Generic REST catalogs support OAuth 2.0 client-credentials and personal-access-token authentication. Direct configuration of credentials for the underlying object storage is not available; use catalog-vended credentials instead.
- Connecting to a REST catalog provides catalog-managed Iceberg tables. It does not provide native ingestion features specific to that catalog's platform (for example, Snowflake Snowpipe or Streams).
- Throughput figures in Stream data from your service to your data lake were measured using Amazon S3 Tables. Generic REST catalog throughput can differ, depending on the catalog's own API latency and table-commit performance.
- In order to collect deletes made to data in the columstore, certain columnstore optimizations are disabled for hypertables, this includes Direct Compress.
- The
TRUNCATEstatement is not supported, and does not truncate data in the corresponding Iceberg table. - Data in a hypertable that has been moved to the low-cost object storage tier is not synced.
- Writing to the same S3 table bucket from multiple services is not supported, bucket-to-service mapping is one-to-one.
- Iceberg snapshots are pruned automatically if the amount exceeds 2500.
- A hypertable with long running continuous aggregates refresh transactions, plus 30 minutes, can cause issues with holding the replication slot too long. Please consider batching in these cases.